D-Link Router Setup | Dlink Login | Dlink Wifi Extender Setup
Become competent/proficient in the Dlink extender and router setup/login with our easy to grasp methods.
D-Link Extender Setup | D-Link Router Setup
D-Link extenders and routers are gadgets made to improve the network in your house or place of business. Routers provide both cable and wireless connections for involving plentiful devices to the net. Extenders increase the strength of the current Wi-Fi signals, increasing coverage and removing dead zones. Both devices offer simple dlink setup procedures via web-based interfaces that let users alter network configurations. Reliability, security, and user-friendliness are given top priority in D-Link solutions, which offer seamless connectivity for a range of networking requirements. In general, configuring dlink router extender setup is simple. This is a summarized guide to back you with the technique:
- Remove the router/extender from the packaging.
- Substantiate you have the Ethernet cable and power adapter (if needed).
- Attach the router/extender’s power adapter to it and plug it in to a power source.
- Link your smartphone or PC to the dlink extender setup/dlink router setup
- Unveil a browser and type your router’s or extender’s provided IP address into the address box.
- Frequently found in the manual or on the router/extender, is the provided IP address.
- Usually, it appears as 192.168.0.1 or 192.168.1.1.
- It’s possible that a username and password entry screen will appear.
- The device’s manual or sticker will provide the necessary login information; if these don’t work, try the provided credentials, which are typically “admin” for both the username and password.
- You will be directed to the router/dlink extender setup configuration page after logging in.
- Either navigate to the wifi settings area or follow the dlink wifi extender setup procedure.
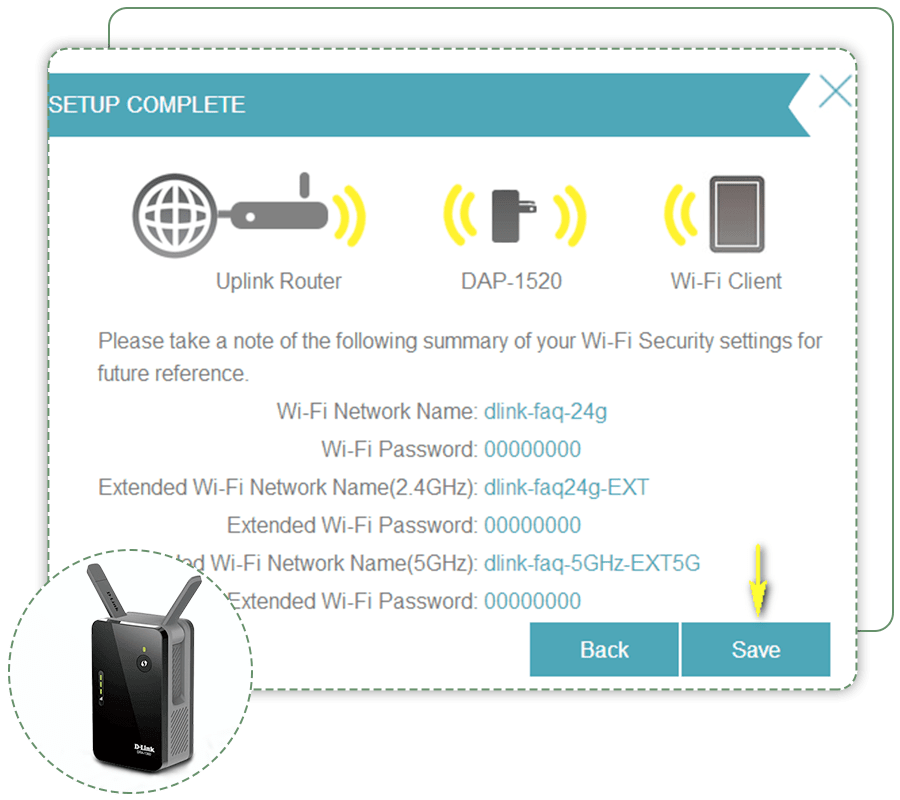
- Configure your password and wireless network name (SSID); WPA2 security is advised for the password.
- Depending on the capabilities and settings of your device, you can also adjust other options like guest networks, parental controls, etc.
- After configuring the settings, connect a device to the newly established wireless network to test the connection.
- Verify that you have internet access, then walk around your area to look for any dead spots that could require an extender.
- When configuring an extender, adhere to the directions that came with the equipment.
- Generally, you will need to position the extender close enough to the regions with inadequate coverage, yet still inside the range of the Wi-Fi signal of your current router.
- To configure the extender, log in to its wireless network with the credentials that were sent to you and visit its settings page.
- Inspect your router or extender for firmware updates.
- The device’s web interface’s settings menu is frequently where you may accomplish this.
- If there are updates available, download and install them by following the instructions. Updates to the firmware can enhance stability, security, and performance.
- To improve security, after everything is configured and operating as it should, you should think about altering the router’s or extender’s provided login and password.
How to Setup DLink WiFi Extender?
Dlink wifi extender setup is relatively simple. Here’s a step-by-step guide:
- Check that you have the power adapter and can reach a power outlet close to your router before opening the extender’s packaging.
- Place the extender close to places with spotty reception but still inside your current Wi-Fi router’s coverage radius.
- You’ll be guided through the dlink setup procedure by the LED indicators.
- Find the Wi-Fi networks that are available on your computer or mobile device, then connect to the one that has the D-Link extender’s provided SSID listed.
- Unveil a browser and type in the extender’s provided IP address.
- After Dlink wifi range extender setup, connect your devices to the extended network and substantiate the connection is steady to test the network.
- For improved control and security, think about changing configurations like the network name, password, and security settings.
D-Link Extender Setup via WPS Method
Using WPS (Wi-Fi Protected Setup) to set up a D-Link extender is a simple and quick process. How to setup dlink extender it is as follows:
- Press the D-Link extender’s WPS button.
- While they are connecting, the router’s and the extender’s WPS LEDs will blink.
- The LED indicators will stabilise after the connection is established successfully.
- Examine the LED indications on the extender or use its web interface to confirm the connection.
- Use the extender’s provided IP address to access the configuration page in a browser to access advanced settings.
- As necessary, change the network name, password, and other configurations.
How to Setup DLink Extender via a Web-browser?
- Turn on the D-Link extender by plugging it in close to your WiFi router.
- Link your PC or smartphone to the network of the extender (sometimes called “Dlink Extender setup”).
- Open a browser and type “http://192.168.0.50” or “http://dlinkap.local” into the bar.
- Type in the standard login credentials, which are often “admin” for both.
- Choose your Wi-Fi network and provide the password as instructed by the dlink extender setup process.
- If necessary, adjust configurations such the password, network name (SSID), and security settings.
- Place the extender where your Wi-Fi signal can be amplified the most efficiently.
D-Link Extender Not Working
If your d-link wifi extender not working then take help of these steps:
- If at all possible, try utilising an alternative power outlet or adaptor.
- Substantiate the extender is not blocked by walls or other objects and is placed within the range of your Wi-Fi router.
- Use the web interface of the extender for firmware apprise.
- Updates can be applied if needed.
- Should the issue persist, try a factory reset by hitting and holding the reset button for ten to fifteen seconds, or until the LED indicators begin to flash.
- Reconfigure the extender with the browser dlink extender setup method, making sure that the network settings and passwords are accurate.
- If the problem continues, get in touch with D-Link support for more help or a replacement if necessary.
DLink Extender Firmware Update
For d-link firmware update trail the followings:
- Assure a dependable internet connection and accessibility to the web interface of the DLink wifi extender setup.
- Go to the help department of D-Link’s official website.
- Search for firmware upgrades according to the model of your extender.
- Select the firmware version that is compatible with your device and download it onto your computer.
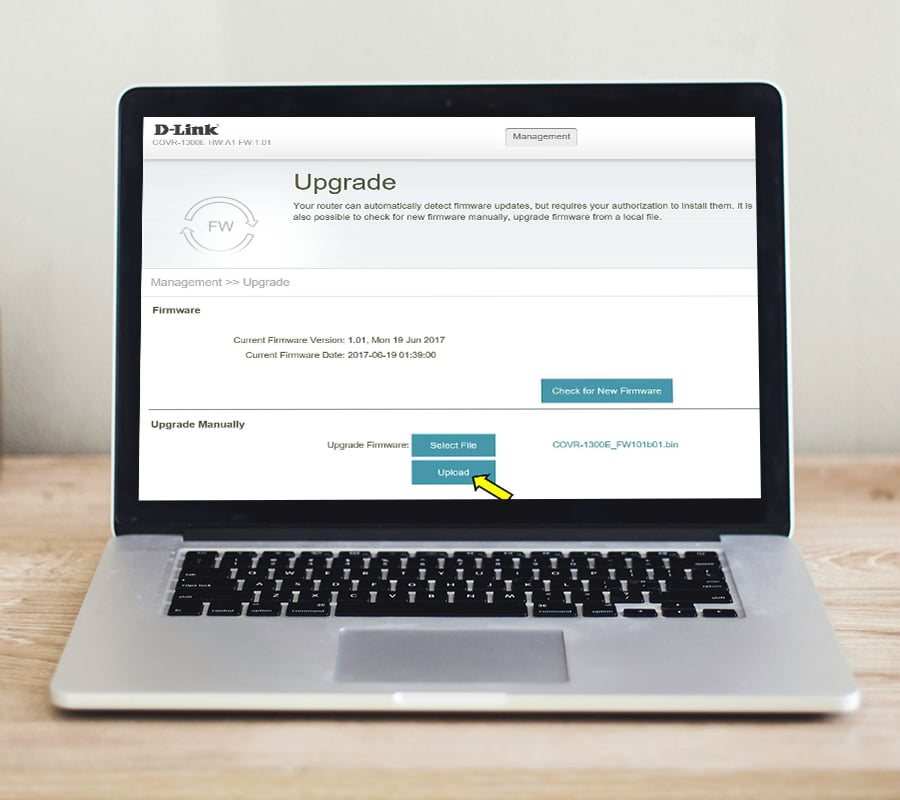
- To access the settings of the extender, open a browser and type in its IP address.
- Find the firmware update option in the settings menu, then follow the instructions to upload the firmware file that you downloaded.
- Permit the extender to finish installing the new firmware; this process could take a few minutes.
- To have the adjustments take effect, restart the extender after installation.
- Verify the firmware update’s success by looking up the new version number in the device’s settings.
D-Link Router Setup
How to setup Dlink router requires the following steps to be set up:
- Take the router’s accessories out of the box for setup Dlink router.
- You have two options for connecting your computer to the router: Ethernet wire or WiFi.
- Unveil a browser and type the router’s provided IP address into the address box.
- To access the router’s web interface, enter the router login details
- Configure language, time zone, and internet connection type, among other basic settings, by following the setup process or navigating through the router’s settings.
- Give your wireless network a name, select a security mode, and create a secure passphrase while executing d-link router setup.
- Examine other configuration options based on your network needs, such as port forwarding, MAC filtering, Quality of Service (QoS), etc.
- In the d-link router setup’s settings menu, look for firmware updates.
- If any are available, update to the most recent version since it might contain security patches and bug fixes.
- Remember to save your configurations before closing the d-link router setup interface after you’ve finished all of the changes.
- In order to improve security, modify the router’s provided login information.
- Save a copy of the manual and configurations for your router in case you ever need to troubleshoot or make adjustments.
How to Setup Guest Network on D-Link Router?
Like D-Link wifi extender setup, setup D-Link router is also easy to execute with these points.
- By entering the provided IP address—typically 192.168.0.1 or 192.168.1.1—in the bar of your browser, you may access your router’s admin panel and log in with your login information.
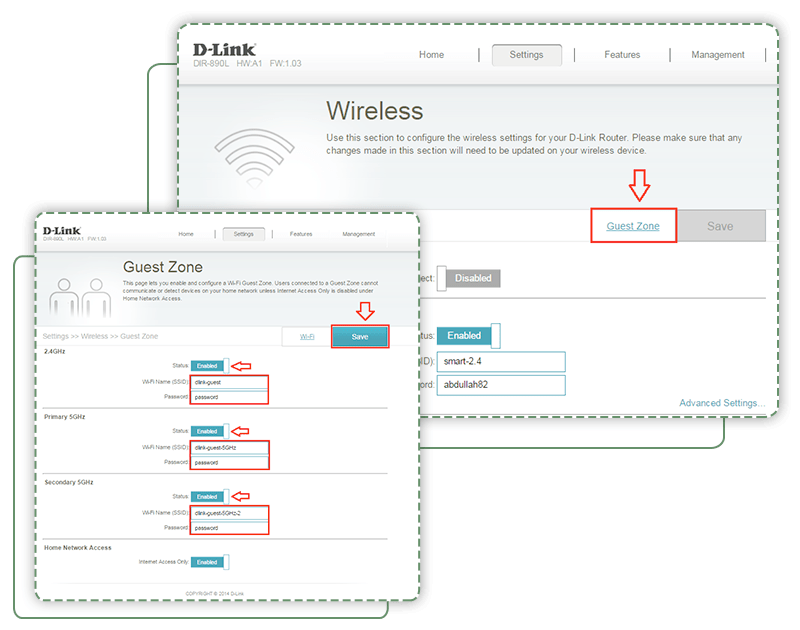
- Go to the Guest Network or Wireless Settings section.
- Turn on the Guest Network function.
- Personalise the guest network’s configuration, including the password and SSID (network name).
- If you’d like, you can set up extra security settings like allowing guest access.
- After saving your modifications, close the settings screen.
- To substantiate the guest network is functioning properly and allowing restricted access to your primary network resources, test it by connecting a device to it.
Troubleshoot the Common Issues On D-Link Router?
Here are some typical problems with D-Link routers that users may run across, along with solutions:
- Absence of an Internet connection:
- Make that the modem has an active internet connection and that the router is correctly connected to it.
- Verify whether the router’s WAN (Internet) LED is lit.
- If not, there may be a problem with the modem’s and router’s connection.
- Try again to link
- Use a browser to view the router’s settings and see if the firmware has been updated.
- Sluggish internet connection
- Verify how much bandwidth each connected device is using on the router.
- It’s possible that some programmes or gadgets are using up too much bandwidth.
- If your wireless connection isn’t working well, move closer to the router.
- If other neighbouring networks are causing interference, think about switching the Wi-Fi channel.
- Install the most recent firmware update for the router.
- Problems with Wireless Connectivity:
- Verify that the router has the Wi-Fi network enabled.
- Both the router and the connected device should be restarted.
- If required, reset the router to its factory settings (be aware that all customised settings will be lost).
- Overheating Router:
- Make that the router is not obstructed by items and is positioned in a well-ventilated area.
- Verify whether there is any dust or debris obstructing the router’s vents, and clean them if required.
- When utilising a cooling pad or fan for extended periods of time, take precautions to avoid overheating.
- Periodic Drops in Connection:
- Examine the physical connections made by the devices and the router to the modem and other devices.
- Install the most recent firmware update for the router.
- To reduce interference, change the Wi-Fi channel or transmission power of the router.
- Look for any appliances or electrical equipment close by that might be interfering.
- Not Able to View Router Configurations:
- To access the router’s settings, substantiate you’re entering the correct details
- Most D-Link routers have http://192.168.0.1 or http://192.168.1.1 as their provided IP address.
- If you can’t remember your login information, reset the router
- LED Indicators for routers:
- To find out what each LED indicator on the router means, consult the user manual or the D-Link website.
- See the user manual or get in touch with D-Link support if any LED indications are not lighting up or are flashing strangely.